|
|
|
 |
|||||||||||||||||||||||||||||||||||||||||||||||||||||||||||||||||||||||||||||
Westfalia T25 / T3 / Vanagon Buyers Guide This buyers guide will give you some useful pointers if you are considering buying a Westfalia T25 / T3 / Vanagon Camper Van. If you already own a Westfalia T25 / T3 / Vanagon camper you may still find this buying guide useful as I have included some useful tips about common faults and possible causes. If you have any useful information to add please contact me. You can start by reading my Volkswagen T25 / T3 / Vanagon Buying Guide, which is a general guide for anyone buying a VW T25 / T3 / Vanagon camper. Once you have read that guide then the information below is additional reading specifically for anyone looking at buying a Volkswagen Westfalia T25 / T3 / Vanagon camper. As I am based in the UK the guide is biased towards the European models but a lot of the information equally applies to the USA and Canadian Vanagon models as well. When checking a bus be realistic as these buses are over 20 years old now so they will generally not be absolutely perfect. The idea of this guide is that it will help you make an informed decision highlighting any problems that exist so that you know exactly what you are buying. You can decide if the camper is worth the asking price and also if you can point out any problems to the seller it can give you a basis for price negotiation. If you find the site useful please consider making a small donation to help pay towards the site running and development costs by clicking the Paypal button on the left (You don’t need a Paypal account to make a donation) ;-) Westfalia VW Camper Frequently Asked Questions: Are all Westfalia T25 / T3 / Vanagon campers Left Hand Drive ? The vast majority of Westfalia T25 / T3 / Vanagon campers ARE left hand drive. There are a few exceptions to this, which have mainly been built using a kit that was supplied by Westfalia called the Mosaik programme (see Model History for more info). These kits were still intended for use in Left Hand Drive vans so will have been adapted to fit a right hand drive van. Also there is at least one (maybe more?) right hand drive camper van that was built by Westfalia at their factory in Germany as a special order. Does it matter that my Volkswagen Westfalia camper will be Left Hand Drive ? If you are based in USA, Canada or most of Europe then obviously not. The paragraph below is for those who like me are based in the UK. The reason Westfalia VW buses are so popular is that the build quality, design and practicality is far better than anything that was built in the UK. Most owners are prepared to accept that these advantages far outweigh the disadvantage of the bus being LHD. It is not difficult to drive a LHD vehicle in the UK. Parking is normally easier as the driver is closest to the kerb. The only disadvantages are: A slight blind spot when pulling out of a slip road or changing lanes to overtake on a dual carriageway or motorway (easily rectified with a blind spot mirror on passenger side or by leaning forward for a second look before pulling out). If you need to take children or goods in and out of the sliding door on a road the sliding door will be on road side if the vehicle is facing the right direction. Generally not a problem unless the van is to be used as a daily vehicle, as for most people the sliding door is most likely to be opened in car parks and on campsites.
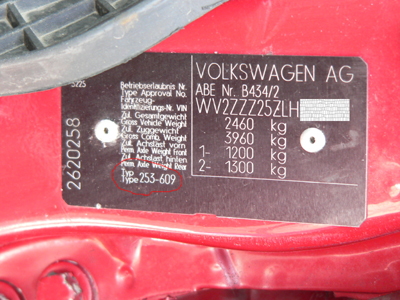
Checks to make when viewing a Volkswagen Westfalia T25 / T3 / Vanagon Camper: Checking that the bus is a genuine Westfalia factory bus. VW Westfalia T25 / T3 / Vanagon campers are generally selling for higher prices than other conversions of T25 / T3 camper. This is because they have a better reputation for build quality and reliability of equipment. Also the vehicles coming from Germany seem to be in better structural condition than a similar aged UK vehicle possibly due to stricter testing, removing structurally unsound examples from the road ? Unfortunately this is leading to less scrupulous dealers advertising buses as Westfalias even when they are not, in order to achieve a better price. Also some owners genuinely believe a bus to be a Westfalia because it comes from Germany (or they were told it was a Westfalia!) when in fact there were many other convertors of VW buses whose quality may or may not be as good. The first check you can make it to have a look at the photos on the VW Westfalia T25 / T3 / Vanagon model history pages and check that the van you are looking at has the right interior furniture and upholstery for that particular model and year. After this it gets a bit more difficult to check as even the original German vehicle logbook doesn’t mention the word Westfalia for some reason ? However all Westfalia T25 / T3 / Vanagon Camper factory conversions were delivered from Volkswagen to the Westfalia factory with a particular bodyshell type called “253 Kombi shell ”. You can confirm if the van you are looking at has this body shell by looking firstly at a metal plate that should be fitted on the inside pillar when you open the passenger (right hand side) door. In the photo below you will see the bus has bodyshell 253-609.
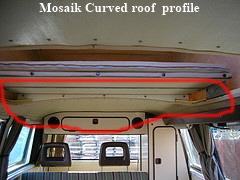
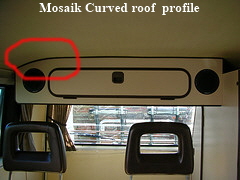
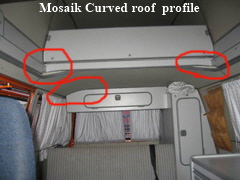
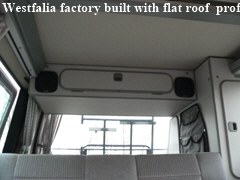
This number can also be crosschecked with the same information on the German logbook (Fahrzeugbrief) and the sticker in the VAG Serviceplan book (and / or in the bus at the base of the steering column) as described lower down. The Westfalia factory built campers used a bodyshell that already had the side window apertures built in when it was delivered from the Volkswagen factory. This means that the apertures were in place when the van was painted. This means that it is much less likely that the van will start to rust around the window seals. Some other inferior conversions may have used a panel van as the base vehicle and had the window apertures cut out later (after the van was painted). This means the exposed edges may not have been sufficiently rust proofed leading to rusting around the window frames which is unsightly and difficult to repair. This problem can also lead to water penetration inside the van causing a damp smell as well as damage to interior trim and furniture. Because the factory made conversion had this body shell there is a very obvious way of spotting some campers were not built at the Westfalia factory. The inside roof had a flat profile as opposed to other body shells that had a round profile best illustrated by the photos below:
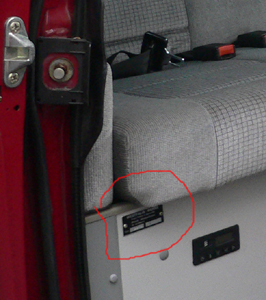
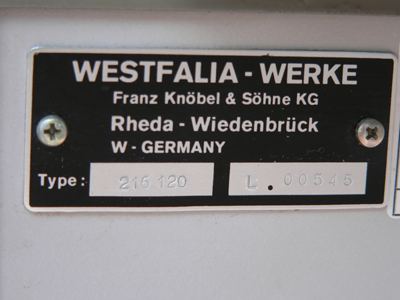
Whilst this curved roof line proves a van wasn’t converted to be a camper at the Westfalia factory it doesn’t necessarily mean the van does not contain genuine Westfalia furniture and fittings! From 1983 to 1990 Westfalia had the Mosaik program which was a range of furniture and fittings designed for people to fit to their own base bus. The range changed over the years but looked very similar to the factory fitted items. Whilst the quality of the items is just as good the disadvantage of buying a Westfalia Mosaik bus is that the specification will vary from bus to bus as the owner could pick and choose which bits he wanted. Also the quality of the build is most likely not as good as the factory as it would depend on the individual who built it. Having said that it was also possible to have the Mosaik furniture installed by your VW / Westfalia dealer. You can read more about the Mosaik range in the VW T25 / T3 / Vanagon Model History. One final way to check if the bus is Westfalia factory built is that each bus has a little metal plate on the left hand side on the rear seat front panel.
Whilst this does not prove the furniture hasn’t been taken from another bus it does at least prove that it has genuine Westfalia furniture! Also you can check the meanings of the numbers to confirm that they match the van you are looking at (ie: year and type). For the example in the photo the meaning of the digits is as follows: 216 means it is a Volkswagen T25 / T3 120 means it is an Atlantic Hightop (119=Atlantic Pop Top, 118=California Hightop, 117=California Pop Top. The Brick-Yard website has a full list of codes HERE. L is the year 1990 (K=1989, J=1988, no I so H=1987, G=1986 etc) 00545 this is van number 545 of this type.
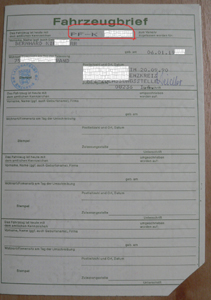
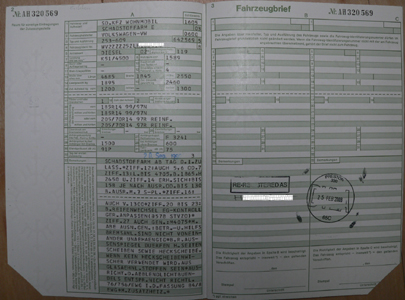
German Logbook (Fahrzeugbrief): When a Westfalia camper is imported from Germany it will have to be re-registered so that it gets allocated a UK registration number. In order to do this the original German log book (Fahrzeugbrief) is submitted to DVLA (along with some other paperwork). Normally DVLA return the German logbook (with the corner cut off and an official stamp showing that the vehicle is now registered in the UK). The vehicle will now have a UK registration document. Whilst the German logbook is no longer valid it does contain some useful information.
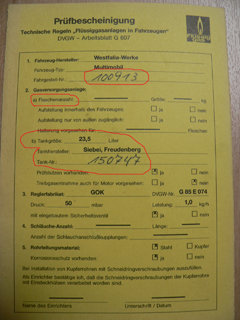
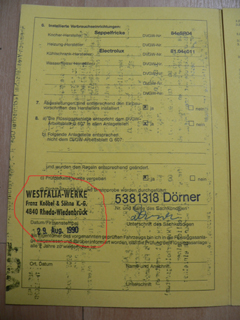
On the first page at the top in large letters you will see the original German registration number. Underneath is the name, date of birth and address of the first keeper of the vehicle as well as the date he acquired the vehicle. On the example above there is only one keeper as it had been owned by one person from new until it was imported to UK. If the vehicle had more previous keepers they would be listed in the appropriate fields underneath. On the second page there is various information including vehicle type, fuel type, key number, chassis number, cubic capacity, length, width, height, weight and the date of first registration. If you want to translate any of the fields the following pages are useful: On the third page you will see the official stamp from DVLA showing that the vehicle has been re-registered and listing the new English registration number. Checking Gas Fittings: Depending on the model and specification a Westfalia camper was fitted with either an external underfloor LPG tank or an onboard gas bottle (fitted in the cupboard to the left of the fridge under the rear table). In Germany the gas fittings have to be checked regularly (in a test similar to an MOT test) so sometimes if there has been a problem with the underfloor tank the fittings may have been converted to run from an onboard gas cylinder. The reason for this is that the external LPG tanks are very expensive to replace. If the van has a gas bottle and you want to check if this was original equipment then ask if the vehicle has the original German documents with it. There may be a yellow document called a Prüfbescheinigung. First you need to check on the second page that the document you are looking at is the first one that was issued for the vehicle. You should see a stamp from Westfalia Werke with a date. The date should be close to the date the van was first registered. If so, you can check on the first page and you will see section one shows the last few digits of the chassis number. Section two shows if either a) Flaschenanzahl (Gas bottle) or b) Tankgroße (LPG tank) were fitted and the capacity of the gas bottle or tank.
If you open up the yellow booklet you should see some more stamps each time the vehicle was tested. From the two yellow booklets supplied with my van it would appear from the dates that the van is required to have this test every 4 years. Now you know how to check the paperwork it is obviously important to have a physical inspection of the gas tank and gas fittings. If there is an external LPG tank mounted under the van check that the tank and mountings are not damaged or rusty. The tank is mounted on the left hand side of the van next to the black waste water tank. A replacement gas tank will cost up to 700 euro plus fitting. There is a locking plastic cover behind which you will find a gauge showing how much gas is in the tank as well as the on / off valve and also the filling point. It is not unusual for the plastic cover to be missing and whilst replacements are available they cost around 80 Euro.
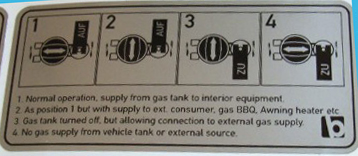
Useful Tip ! When filling the LPG tank in the UK you will need an adaptor as the fittings at UK filling stations are different than those in Germany. Useful Tip ! Information stickers are available from Brickwerks showing the various options for gas control settings
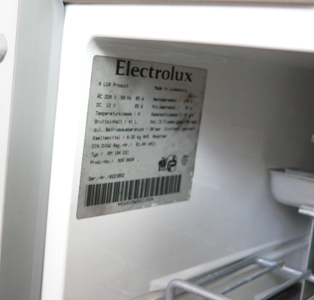
You will see the gas pipes enter the van from the external tank into the cupboard to the right of the fridge. You will see the yellow and red gas shut off valves (explained further in the sections below). Check that the pipes have not been damaged and that the joints look secure. Obviously if you buy the van it is a good idea to have the whole gas installation checked by a qualified professional such as those listed on the links page. If the van has an onboard gas bottle check the pipes that should run from the regulator on the top of the gas bottle to the gas shut off valves (in the cupboard to the right off the fridge). Westfalia Fridge: Most Westfalias came fitted with an Electrolux RM184 Fridge (although earlier vans and American Westfalia Vanagon vans may be slightly different). To check the model of the fridge fitted you can look at the silver label that is usually situated inside the fridge on the left hand side. You may need the model and serial number from this label when ordering any spare parts.
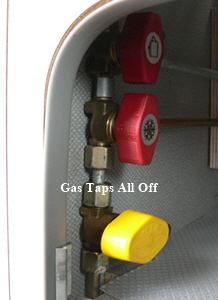
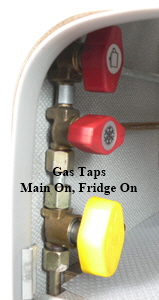
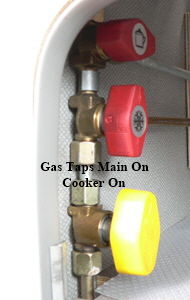
The fridge should work from either the gas bottle or underfloor gas tank depending which is fitted. To test make sure the gas is switched on (Note “Auf” means open ie: on). Then look in the cupboard under the sink and turn the yellow (main) gas switch and then the bottom red gas switch as in photo below.
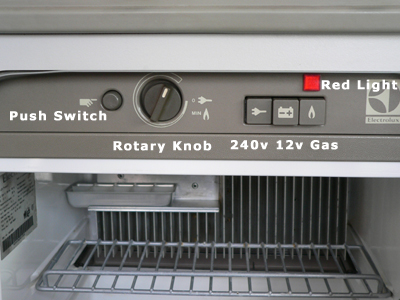
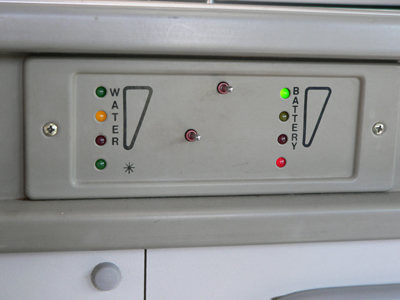
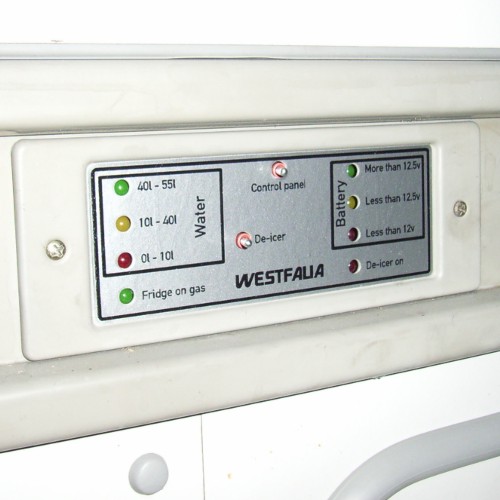
Open the fridge door and turn the rotary knob as far as it will go clockwise. On the three bank switch at the top press the gas switch showing the “Flame” symbol. You should see the small red light flash and hear a clicking noise. Now press and hold in the push switch until the clicking noise stops and the red light doesn’t flash. Hold the push switch in for a further 10 seconds. When you release it the clicking / red light flashing should not restart. The fridge is now lit and if you feel the metal cooling fins inside the fridge at the top they should start to get cold after 20 minutes or so. If you look in the bottom corner of the inside of the fridge you should see a small viewing hole. When the fridge is running on gas you should be able to see a small flame if you bend down and view from the right angle. The van has a mains inlet on the left hand side covered by a flap (next to the water inlet and gas exhaust outlet). On most camp sites you have the option of plugging the 240 v supply into this mains inlet. Sometimes when buying a van a connection cable will be included but quite often you will need to buy your own from a caravan supplies stockist. When you are using a campsite hook up you can run the fridge from the 240 volt supply. It is not easy to test if the fridge is on, as when running on 240v the fridge takes longer to cool than when on gas. You could ask the owner if it is possible for him to put the fridge on prior to you viewing the van or if you have the time you would need to ask the owner if he has a hook up lead and get it connected from the house to the external hookup input socket on the side of the bus. Then open the fridge door and using the three bank switch at the top select the one with the “Plug” symbol. The fridge is now switched on but the only way to tell it is cooling is to wait a couple of hours and check the metal cooling fins inside the fridge at the top or if you have a thermometer you could leave it inside whilst checking the rest of the van. Also when the engine is running the fridge will work on 12 volts from the leisure battery. This is really only used when the fridge is already cold from gas / electric and then you decide to drive somewhere else. You can open the fridge and using the three bank switch at the top select the one with “car battery” symbol. Once the engine is running the 12 volt fridge element will maintain the fridge at its existing temperature. It doesn’t really have the power to cool the fridge from room temperature and only works with the engine running (so that it doesn’t flatten the leisure battery). Checking Westfalia Tap and Water Tanks: The fresh water tank is filled up from the water inlet on the left hand side of the van. It should have a locking filling cap. Check that the owner has the key for this as it is a separate key. If there is no key check that it is unlocked as getting a replacement filler cap is easy but it can be difficult to remove a locked cap without the key. Put some water in the tank and then look under the van to check there is no water dripping out as this could mean that there is a hole in the freshwater tank (expensive!) or that the screw-on cap on the tank drain outlet is cracked or leaking (not so bad as cheap replacements are available from Gunzl Classic Parts). The water level of the freshwater tank can be checked on the diode display on the front of the kitchen unit.
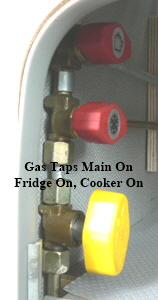
In order for the diodes to light you flick the little metal switch at the top to the right. For the water level the LEDs mean: Green lit - Between 40 and 55 litres water in freshwater tank. Amber lit - Between 10 and 40 litres water in freshwater tank. Red lit - Between 0 and 10 litres water in freshwater tank. Note: Depending on the age of the van the appearance may be slightly different than the version shown. Note also that it is quite common for the water level indicator to not be working correctly especially on older vans. This is because it relies on a magnetic float in the water tank moving up and down a rod that converts the height of the float to an electrical signal. If water penetrates the workings inside the rod then it soon breaks. If you are knowledgeable in electronics then repair may be possible (Brick-yard forum has good descriptions HERE and HERE). There is also an older type that doesn’t use the float but a number of resistors in the tank (Brick-yard forum has a good description HERE) Once the water level is known try the electric tap to make sure the electric pump is delivering water to the tap. Possible faults are the pump itself (situated in the water tank in most models) or the switch on the tap. Original replacement taps cost around 40 euro, electric pumps of similar specification around 30 euro. Check for water leaks in the cupboard under the sink possibly from the plug hole area or the drainage pipe. Also at this point it would be a good idea to check the dirty water tank underneath the van (if the Westfalia you are checking has one). This is the black tank on the left hand side. It has a small tap to drain dirty water so check tap is working and that tank is not leaking. Checking Westfalia Cooker: The cooker should work from either the gas bottle or underfloor gas tank depending which is fitted. To test make sure the gas is switched on (Note “Auf” means open ie: on). Then look in the cupboard under the sink and turn the yellow (main) gas switch and then the top red gas switch as in photo below.
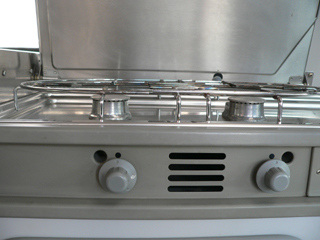
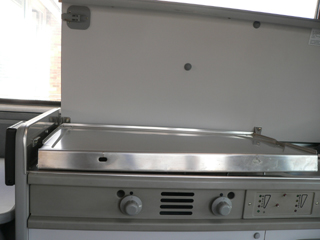
To light the cooker lift the lid that covers the sink / cooker rings then push in and turn the cooker control knob for the ring you want to light. You should hear gas flowing. Light the gas with a match or cooker lighter. Once lit hold the cooker knob in for a further 10 seconds and then release it. The gas should stay lit. Repeat test for other cooker ring. If the knob is released too early the gas should go out. This is a safety feature so that the gas cannot be left on by mistake.
Useful Tip ! In most VW Westfalia Campers the lid above the cooker has an integral metal flap that pulls down when the cooker is not in use and can be used to drain washing up etc. Pull this metal flap down and check the flap and the inside of the lid for burn marks or damage. This occurs when someone uses the cooker ring and then puts the lid down before the cooker ring has had time to cool.
Checking Westfalia LED Panel: The LED panel on the front of the kitchen unit can give some useful indications.
As already explained above it shows the level of the freshwater tank. On the right hand side the battery level indicator shows the status of the leisure battery. For the leisure battery level the LED’s mean: Green lit - more than 12.5 volt (good). Amber lit - less than 12.5 volt (ok). Red lit - less than 12 volt (not good, leisure battery either needs charging or is faulty). The green LED at the bottom left will light when the fridge is running on gas (although there is no visible indicator when it is running on electric or leisure battery). The red LED at the bottom right is lit when the bottom switch is flicked to the on position. This indicates that you have switched the Eis-Ex (Ice-Ex) function on. This is only required when the outside temperature is extremely low. It will preheat the gas as otherwise when you light the cooker the flames may be very high ! Note: Depending on age of van the appearance of display unit may be slightly different than the version shown. USEFUL TIP Information stickers are available from Brickwerks for the various style of display .
Useful Tip ! If the lights on the unit flicker on and off or wont come on at all it is most likely due to bad soldered joints on the back of the unit (especially around the switch). Remove screws then unplug unit and once unplugged resolder joints. Do not try and solder whilst connected or you will blow the fuse that is situated behind drivers seat at the base of the B-Post. If the display doesn’t light up AND the tap doesn’t work AND the fridge doesn’t work on 12 volts check this fuse first !).
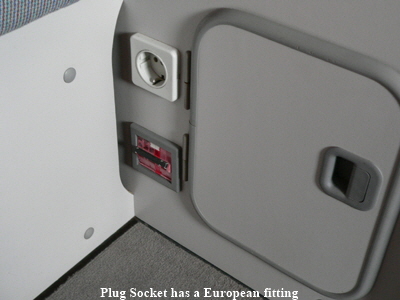
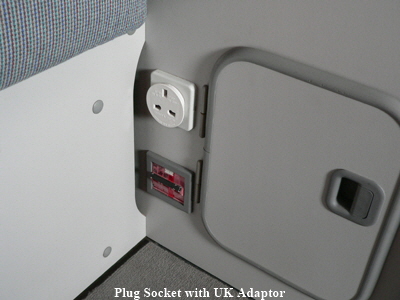
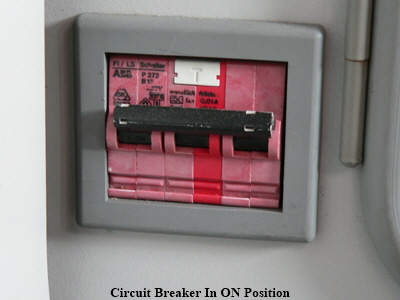
Checking Westfalia Electrical and Split Charging System: On a diesel van the main battery for starting the engine is in the engine bay. The leisure battery (if this Westfalia model has one) is situated in the box underneath and to the rear of the drivers seat (left hand side of van). On a petrol van the leisure battery is situated in the same place but the main battery is in the box underneath and to the rear of the passenger seat (right hand side of van). The base of the rear seat / bed lifts up to reveal a storage area. On the left you will see a black box (known in German as the Ladegerät). This is the battery charger. When the engine is running both the main and leisure battery are being charged via the alternator. When the van is plugged into the electric via the external hook up connection the leisure and main batteries should both be charged via the black box charger. If you put a volt meter across the +ve and -ve terminals of either battery (only do this if you know how to use a multimeter) you should see the voltage rise from around 12.5 volt to 14.5 volt when the mains hook up is plugged in or the engine started. When the mains hook up is plugged in you should also be able to use the internal plug socket (mounted on the side panel under the rear table). Try plugging something in and checking it works ok. If not check that the circuit breaker is switched on. Note that this socket is only live when the mains hook up is plugged in. It does NOT run via an inverter from the leisure battery.
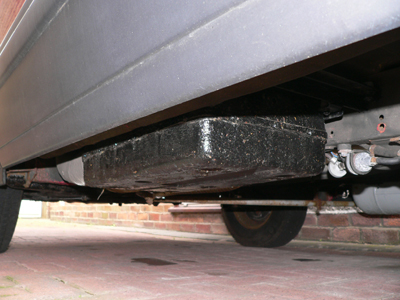
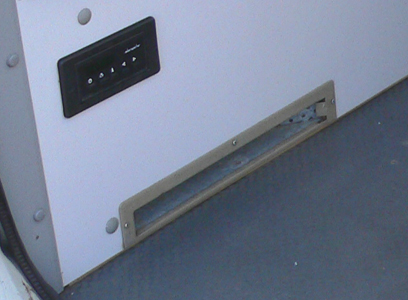
In the rear of the van there will be some fluorescent lights normally above the kitchen unit and sliding door and if hightop then also in roof area (model dependent). Check the lights are working. Useful Tip ! For some reason Westfalia decided to power the rear interior lights, cigarette lighter socket and the radio from the main battery that powers the engine. It would have been better to power them from the leisure battery so that the main battery is not discharged when camping (and using lights and radio while van engine is off). The Brick-Yard forum shows how to modify your wiring to power the radio, cigarette lighter socket and rear interior lights from leisure battery HERE. Checking Eberspacher Heater: A lot of Westfalia T25 / T3 campers came with a night heater manufactured by Eberspacher. The heater runs from the same petrol or diesel tank that supplies the engine. The main heater components are in an external oblong metal box under the van on the right hand side. The hot air enters the van from a metal vent at the bottom of the rear seat on the right hand side. There is an exhaust pipe running from the unit underneath the van to the opposite side of the van.
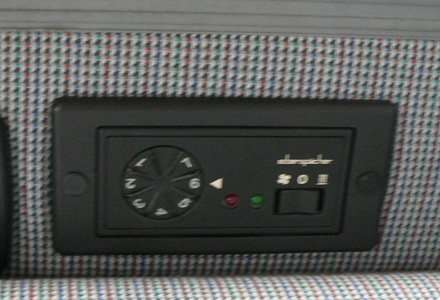
Useful Tip ! Do not run the night heater whilst also having the window behind the kitchen unit open as it is likely the exhaust fumes from the heater will be drawn into the van. The heater is controlled from a thermostat and switch mounted in the panel above the rear seat on the side wall next to the sliding door.
To switch the heater on using the thermostat panel on the side: Turn the rotary thermostat to the maximum (7). For cold air push the toggle switch down on the left hand side and you should hear a fan start and cold air should start coming out of the metal vent at the bottom of the rear seat. For hot air push the toggle switch down on the right hand side and you should hear a fan start and initially cold air should start coming out of the metal vent at the bottom of the rear seat. After about two minutes the air should start getting warm. By setting the thermostat to the desired temperature the heater should switch itself on and off automatically to maintain that temperature. Useful Tip ! Note that you may hear a ticking noise when the hot air is coming out. This comes from the petrol pump supplying the heater and is normal although on some vans it is really loud and others not so loud ? To switch off the heater return the toggle switch to the middle. Depending on the Westfalia model there may also be a timer unit on the rear seat panel above the metal vent where the heat comes out.
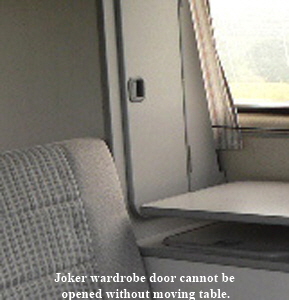
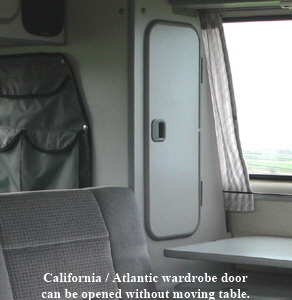
If a timer unit is fitted then a quick test is to start with the heater switched off (and thermostat set to max) and then push the middle button on the timer unit with the “heat” symbol. The fan should then start and initially cold air should start coming out of the vent at the bottom of the rear seat. After about two minutes the air should start getting warm. To switch off press the middle button with the “heat” symbol again. Useful Tip ! The most common problem is that the fan comes on but the after about a minute it switches itself off instead of starting to blow warm air. The main reason for this is that the leisure battery is not fully charged. During the start up cycle a voltage check is made and the unit switched off if the voltage is not high enough. To prove if this is the problem you could try the test again with the engine running or plug in the mains hook up for a few hours and try again once the leisure battery is fully charged. Useful Tip ! If there appears to be no power to the heater or intermittent problems then check the fuses behind the drivers seat at the base of the B-Post. The fuse could either have blown due to a fault or quite often a loose connection leads to overheating of the fuse holder. A lot of vans imported from Germany have had the Eberspacher night heaters disconnected. If there has been a problem with the heater in the past it is cheaper to disconnect it than have it repaired. Obviously if you buy the van it is a good idea to have the heater installation checked by a qualified professional such as those listed on the links page. Checking Carpets, Curtains and Upholstery: Check seats for wear (some Westfalia Upholstery material wears better than others), cigarette burns and tears. Depending on the model it can be difficult to get original fabric to repair problems. Check that the cushions over the engine bay and in the roof are present and not damp. Personally I would prefer that all the cushions, curtains and upholstery are original Westfalia but the cheaper the bus the less relevant this is. As well as the curtains attached to the rails there should be a clip on curtain for the sliding door and if you are lucky the clip on curtain that covers the drivers window, passenger window and windscreen. Seat swivel and armrests: If the bus has rotating front seats you will see a metal lever at the front centre of the seat near the base. If you press the lever down it should be possible to rotate the seat on its swivel base. Sometimes they can be stiff if they haven’t been used much but it is fairly easy to remove seat, loosen nuts and lubricate mechanism if required. If the bus has captains seats check the operation and condition of the armrests. The armrests should swing up and down. On the bottom of each armrest there is a knurled plastic knob that when turned should adjust the height of the armrest (up and down) when in the lowered position. Checking Volkswagen Westfalia Camper Furniture: Open each cupboard and check operation of hinges and handle. Check operation of swinging table and lift lid on kitchen unit. Check underside of lid is not burnt from cooker. Check operation of rock n roll bed. The wardrobe door (behind rear table) normally has a mirror on inside as does the front roof locker on high top models. Check furniture for large chips or scratches. Sometimes the wardrobe door (behind rear table) has had the bottom cut off so that the door could be opened with table in situ. Westfalia finally rectified this design fault in California / Atlantic models when the door was slightly shorter so that it could be opened with table in situ.
Checking Westfalia Pop Top Roof: The VW Westfalia T25 / T3 Pop top roof consists of a large fibreglass rear section with hinges at the rear that is held in place inside at the front centre by a large catch. Above the cab area the Westfalia Joker models have a front luggage rack whilst the later Westfalia California and Westfalia Atlantic models have a fibreglass roof spoiler. Firstly check for any exterior damage to both the fibreglass roof and also to the front luggage rack / spoiler ( you may need a small ladder to check this properly ). If the luggage rack is fitted it should have metal loops for fastening straps to when securing loads. Quite often the loops corrode but replacements are available. Next go inside the van and raise the roof. If not sure how to do this ask the owner to show you but basically to release the catch you stick your fingers behind the metal cover and pull the levers towards you. Then push up the support brace until it locks in place. Once the roof is raised check the canvas. Common places for wear or for it to rip are along the rear edge above the rear door, anywhere the canvas can get trapped such as between the brace when it is being lowered and at the front where the catch is. Now check for any damage on the outside of the van where the rear hinges are. When raised there is a zip at the front to open a ventilation hatch. Unzipping this should reveal a mosquito net and it should also be possible to unzip the mosquito net. Check the zips work and that there are no holes or rips. The inner surface of the fibreglass roof is made from a flock like material that can be damaged if scrubbed too hard when it has been cleaned. Visually inspect and feel it for moisture and look for mould spores that could indicate a damp problem. Around the outside bottom edge of the fibreglass roof is a rubber seal that should prevent water being drawn into the van. With the roof lifted you can also view the metal gutters and check they are not rusty or blocked by leaves or moss and allow water to drain freely. Useful Tip! The interior flock material can be cleaned by spraying with diluted Miltons fluid ( roughly 10 parts water to 1 part Miltons fluid) and then brushing lightly with a soft brush (if you brush too hard you will damage the flock). This should remove any stains and mould spores and make the flock look like new. Dont spray anywhere other than the flock material and wear a mask and goggles. Your bus will smell like a swimming pool for a while but smell fades eventually ! If the roof has a small skylight then try raising and lowering it. The mechanism is prone to wear but replacement parts are available to repair. Check the plastic of the skylight for cracks. Check the rubber seal is intact. Fold out the double bed in the roof and check the original cushions are in place and not damp. Check the hinges used when folding the bed board out are not damaged. Checking Westfalia High Top Roof: From the outside check for any physical damage / signs of repair to the fibreglass shell as it is not unknown for drivers to forget they are in a hightop and drive into a car park or barrier with height restrictions etc. On the inside have a look at all the interior trim panels. It is common on older models for the lining of the roof trim to start peeling off. It can be repaired but it is difficult to get the original materials.
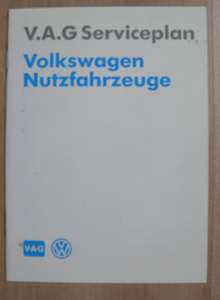
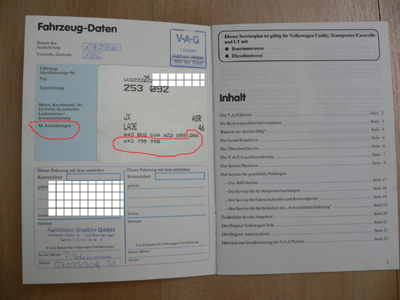
Next check the front double glazed window for signs of leaks or cracks especially if there is condensation between the panes. If the curtains are in place have a look behind them. Now have a look at the skylights, check they wind up and down ok and that when down that they seal ok. Check that the fold out bed operates properly and that the original cushions are in place and that they are not damp (possibly due to faulty skylight). If the roof has any interior lights (Club Joker, California or Atlantic models) check that they are working. Open the front roof locker and check hinges, catch and interior. Inside of the door should have a mirror attached. Electric Mirrors / Electric Windows: If bus is fitted with electric mirrors and / or electric windows check that they work ok. Useful Tip ! Note that buses factory fitted with electric mirrors will have a heated rear screen switch even if they don’t have a heated rear screen (ie models with double glazed rear window). This is because the mirrors are also electrically heated and the heating is turned on by using this switch. Factory Fitted Options (M Numbers): There are two ways to check what options a particular bus was fitted with when it was new. If the owner has the original VAG Serviceplan book there should be a sticker located on the inside cover. Under the field M-Ausstattungen you will see some numbers. Each number is an option the bus was fitted with. The number can be translated by looking at the appropriate page in the Westfalia T25 / T3 / Vanagon model history or by using this useful page on VWT3.com site.
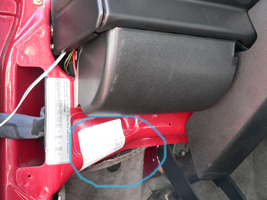
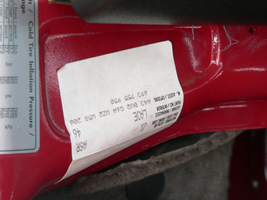
If you don’t have the original VAG Serviceplan book you should check under the fusebox at the base of the steering column on the left hand side of the bus where you may find the same sticker.
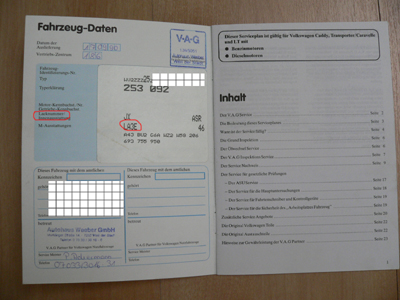
Westfalia Van Paint Colour Codes: There are two ways to check the original colour of a particular bus when it was new. If the owner has the original VAG Serviceplan book there should be a sticker located on the inside cover. Under the field Lacknummer you will see some a code such as H3H3. The paint code number can be translated by looking at the appropriate page in the Westfalia T25 / T3 / Vanagon model history or by using this useful page on VWT3.com site.
If you don’t have the original VAG Serviceplan book you should check under the fusebox at the base of the steering column on the left hand side of the bus where you may find the same sticker. See photos above for clarification of sticker location. Checking Chassis Number: The chassis number is on the metal plate that should be fitted on the inside pillar when you open the passenger (right hand side) door. See photo above for clarification. It should also be on the front chassis outrigger on the right hand side of the van. Check that it matches the number on the English logbook (and German logbook if available), and on the sticker on VAG Serviceplan book and / or the sticker located below the fusebox at base of steering column as previously mentioned above. To get notifications when this website is updated subscribe to my VW Camper Blog or Follow Us on Facebook. If you find the site useful please consider making a small donation to help pay towards the site running and development costs by clicking the Paypal button on the left (You don’t need a Paypal account to make a donation) ;-)
|
|||||||||||||||||||||||||||||||||||||||||||||||||||||||||||||||||||||||||||||
|
Please read the Disclaimer and Privacy and Cookie Policy before using this site. |
|||||||||||||||||||||||||||||||||||||||||||||||||||||||||||||||||||||||||||||
|
© Copyright 2009 - All rights reserved |
|||||||||||||||||||||||||||||||||||||||||||||||||||||||||||||||||||||||||||||
